
Snowy Landscapes Preclass
For this level 4 class, you probably have most of the supplies you’ll need since you’ve got some experience under your belt before taking this course!
How class works
Given that people learn in different ways, Each lesson will contain photos with closeups and discussion of different sections of the finished painting. I recommend reading those before watching the video, which will be later in the lesson, and hopefully having the end result in mind, you can watch for how that section was created. Note particular areas you want to see, and have pencil and paper handy to note the timestamps when each layer happened so you can go back to review it.
Know that YOUR painting need not be exactly like the demo painting. Each of us is unique, and we each have our own approach, color selection, brush strokes – and add in water and paper and you have a guarantee that we’ll all have paintings that work out differently!
PRACTICE TIP: Demonstrations are each done on quarter sheets – that’s a quarter of a 22″ x 30″ sheet, meaning 11″ x 15″. While you might want to practice on smaller paper, small paintings require very different techniques – and brushes – than do larger pieces. (My apologies to those for whom a 22″ x 30″ is a normal size!) If you want to practice techniques without using an 11″ x 15″ sheet, divide the sheet into thirds using tape (3 vertical skinny paintings), and try a sky in each one, then a portion of a tree in each at the scale they would each be painted on an actual quarter sheet.. That might allow for trying different brushes and colors at scale while preserving paper. I do that on the backs of failed paintings – a great way to learn from every square inch of a sheet of paper!
Before we start…a little housekeeping
I retain the copyright to the content you are learning in class. That means…
- Do not sell or give away the concepts from my classes – you may not re-teach my instruction contained or created within these lessons.
- Do not post a video tutorial or step by step photo tutorial of your own redraw of class content.
- Do not repost any handouts you receive in class.
However…I love to see students making strides and taking this teaching and personalizing it with your own skills.
- DO make your own designs and develop your own style! I love that!
- DO gift your creations made with these techniques, of course!
At the bottom of each lesson you’ll see some ways to share your homework and ask questions, so that’ll be handy for you.

Palette
When creating a larger painting (quarter sheet or above), having a palette with large enough wells to mix paint in really helps! I’m not suggesting you need this crazy House of Hoffman palette – I had to save up for years to get one. But if you’re working with a tiny palette and painting with tiny brushes, some techniques in the Landscape Foundations series may not work well. Treat yourself to thinking, “I’m worth using a quarter-sheet on this lesson even if I’m intimidated by it!”
You also don’t need all the brushes I list – but you can see the sizes here. Bigger brushes are going to help in covering the real estate on a larger piece of paper, and will also make shapes that are larger, cleaner, and simpler. Well, after practice that is!
Watercolor Paper
Good paper is important! I forgot to include it in the preclass video, but that doesn’t mean it’s not a priority. Oops 🙂
Choosing to work on student grade papers will hamper your results, create funky edges, and cause more blooms than a good high quality cold press or rough watercolor paper. It should be 100% cotton, sometimes called “rag” – if a paper doesn’t list that it’s made with cotton, avoid it. A few brands I’ve found just exclaim what great papers they are but won’t say what’s in it. That doesn’t mean painting on them is always bad – but for this class i encourage choosing Arches or Saunders Waterford.
Paper color is a personal preference; Arches has natural or bright white, and Saunders Waterford has a High White; many watercolor papers are a little more cream than white, but that’s normal. (Sometimes a whiter paper will even cost more.)
For demos in this course Arches Bright White was used to keep the snow as white as possible.
Cold press vs rough? Again, personal choice. I get way better drybrush effects and beautiful edges on rough, but it can be challenging for small details. K\(Thus helping avoid getting lost in unnecessary detail!) Most people use cold press. (I don’t recommend hot press at all for this course.)
- Arches
- Saunders Waterford
Watercolor Paints
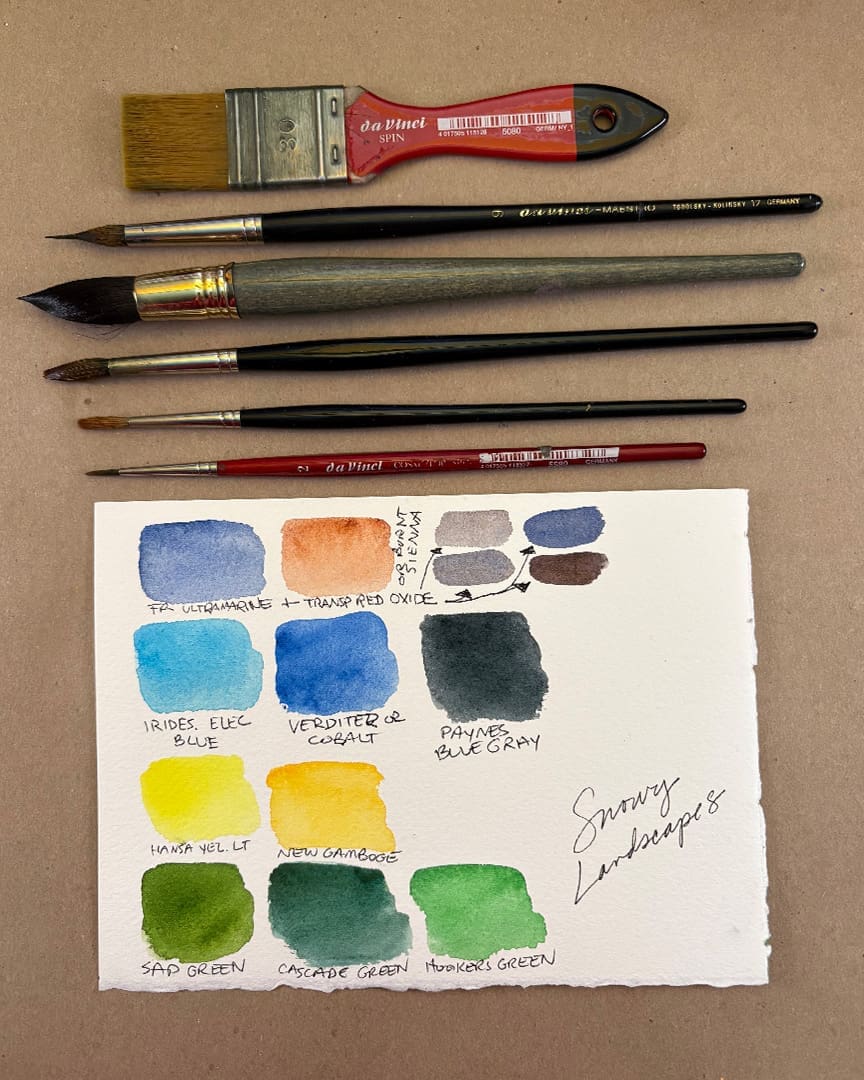
Daniel Smith Watercolors are used in this class, but you can certainly use other artist quality paints. And other colors! Check the photo below and swatch your colors to see if you have something close.
The most common mix used in this class:
- French Ultramarine French Ultramarine BLICK | AMZ | JACKSONS
- Transparent Red Oxide Transparent Red Oxide BLICK | AMZ | JACKSONS
Other blues used:
- Iridescent Electric Blue Iridescent Electric Blue BLICK | AMZ | JACKSONS
- Verditer Blue Verditer Blue BLICK | AMZ | JACKSONS (Cobalt Blue would be a great substitute for Verditer)
- Paynes Blue Gray Paynes Blue Gray BLICK| AMZ | JACKSONS
Other colors used minimally:
- Hansa Yellow Light BLICK| AMZ | JACKSONS
- New Gamboge BLICK | AMZ | JACKSONS
- Sap Green BLICK | AMZ | JACKSONS
- Cascade Green BLICK | AMZ | JACKSONS
- Hookers Green BLICK | AMZ | JACKSONS
Brushes
It’s always a good day to treat yourself to a new brush. The needle brush is used extensively in this course, I highly recommend it. For detail I used a Sable 4 – but if you prefer a synthetic with some snap then go for that 🙂
- Escoda Joseph Zbukvic #16 Mop Jacksons
- Winsor & Newton Kolinsky Sable Series 7 Round 8 brush AMZ
- Da Vinci Series 17 Maestro Long Needle Red Sable, Size 8 or 9 Blick | AMZ
- Da Vinci Mottler Flat Wash Blick | AMZ | Jacksons
- Da Vinci Maestro Kolinsky Sable Round 4 BLICK | AMZ | JACKSONS
- Da Vinci Cosmotop Spin Brush Round 2 BLICK | AMZ | JACKSONS
Miscellaneous supplies
- Spray bottle – can be any kind
- White artist tape, 3/4” – white helps keep color distraction away from your art
- Kneaded Eraser and a regular pencil
- Graphix Incredible Board, cut to quartersheet size, or some people like a 12×16 Ampersand Hardbord
- White gouache though this is NOT used in class, you may want it on hand if you’re new to leaving whites.
Share homework & ask questions
Artventure Community
Join our active art community of thousands of artists on the Mighty Networks app or on the web. You can get quick feedback, help, and answers, as well as getting to know other artists near you and around the globe! Free to join.
Monthly Open Studio
Sign in for one of our Zoom calls – “office hour” as a community! Submit work for critiques, questions about techniques, get to know fellow students! See the calendar at Artventure for upcoming dates. Replays available free for 1 week.
Discover more from Art Classes
Subscribe to get the latest posts sent to your email.